Showing posts with label eotd. Show all posts

Monday, February 17

Pastels


I know, I know. Pastels are ALWAYS a hit for spring fashion. Some winter colors transition over, but the lilacs and mints are always present. I wanted to try a few new things today and I'm hoping they inspire you to jump-start your spring season as well as give you ideas of your own for makeup that's outside your normal routine.

Tell me, which one do you like?

...ONE...smoky lavender eyes


...TWO...baby blue lines


...THREE...icy white eyes


I love the simplicity of the white, but I think if I'm stepping outside my makeup box, I'm really liking the blue eyeliner. It's just so FUN!

Wednesday, December 18

Emerald Smoky Eyes


Remember the other day I asked if someone would remind me to do this tutorial for you? Well, of all people, I reminded myself! I figured I should go ahead and get it done because if I put it off for too long, I'd really forget. **Ahem, celeb makeup tutorial, no mirror makeup challenge, AHEM. **

I wasn't too drawn to this emerald eye crayon from the drugstore shelf because I thought it would clash with my blue eyes. But once I had it on, though? That was a totally different story.

The thickness of the pencil made it easy to apply to my eyes and the sponge applicator on the other end smudged the color b-e-a-utifully. I wanted to show you four quick steps in applying this and achieving a smoky eye in just a few minutes. Once you have applied all makeup except for your eyes, follow these suggestions:

1) Line your eyelid with a thick line almost up to the crease. I used Maybelline Master Smoky Longwearing Shadow Pencil in Emerald Fury.
2) Blend to a little above the crease and out to the corners making a wing and apply a brown shadow to the crease to give your eye some depth. I used Mac eye shadow in Haux.
3) Line your lower lash line, including your water line, all the way out to the corners meeting with the color above.
4) Blend both lines until you achieve the smokiness and wings that you desire. I also added in a mini #ootd. Don't shoot me.

Finish this look off with two coats of your favorite mascara and a little bit of highlighter dusted on your cheekbones and your nose. You can add your favorite nude lipstick or dare to go bolder and add a pretty light pink!

[ONE]

[TWO]

[THREE]

[FOUR]


Hello Gorgeous shirt: ON (simliar) // Gray cardi: Target (old) // Plum cords: ON // Taupe booties: Gap

I'm linking up with Random Wednesday and Wildcard Wednesday.

Wednesday, November 20

Catching Fire

I'm not sure that I want to admit this, but I wasn't always a fan of The Hunger Games. I know, right?! I hesitantly watched the first movie after it was already playing on Netflix and because there wasn't really anything else I wanted to see at the moment.

As we all know, it was an uh-mazing movie. I decided that I wanted to see the second, third, and fourth movies, but I wanted needed to read the books first. So I started from the beginning. I read the first and I finished the second book today (did I mention that I'm listening to the audio books?) just in time for Catching Fire's premier on Thursday at midnight.

Where am I going with this? Well, I decided to show you two eyeshadow looks that were inspired by The Hunger Games trilogy. The first one I tried to mimic District 12's look based on the Covergirl ads--because we are all obviously behind Katniss--and the second is my own interpretation.


I used this gray color from the ELF holiday eye shadow palette all over my eyelids. 


And then I used two things for the gold color. I first applied the gold side of Covergirl's Smoky Shadow Blast in Turquoise Ember. And then applied this gold shadow below. It gave the gold a lot more depth.


The second look is something I'd actually wear to work. Instead of the District 12 "coal" look like above, I wanted to focus more on the burning embers of the coal. So there's some purples, blacks, reds, and golds to represent the fire.


I applied Korres eyeshadow in Plum to my lids, BH Cosmetics baked eyeshadow in Aphrodite to the creases, and MAC pearl eyeshadow in Expensive Pink to the inner part of the crease and inner lids, and Covergirl's eyeshadow in Shimmering Onyx to the outer corners. I finally applied that same gold shadow from above to the inner tear ducts and completed the look with some black liquid liner and mascara.

Are you ready for the premier of Catching Fire? Are there any District looks that inspire your makeup routine? Here are some of the others that I'm dying to try out one of these days.


I'm linking up with Whatever Whenever Wednesday and Random Wednesday for today's post!

Monday, November 11

boho smoky eye - UD naked look no.1

(pic)
What is a boho smoky eye, you might ask? Well, I was first inspired by one of my favorite MUAs, Linda Hallberg, and she featured the eyes with a rich mahogany/rusty color. The part that made it boho was the no eyeliner and no mascara.


Bohemian looks are very earthy and one with nature. Eyeliner and mascara just don't fit, yanno? I wanted to create a similar look. And not to create the EXACT same look, here's my take on it.


I applied my makeup like normal except for my eyes. I only used one eyeshadow from the Urban Decay Naked palette to create this look. I extended it past my eyelids and gave it a rounded shape also while applying it to my lower lash line.
The color I chose was a brown/purple-y color that I knew would be just perfect aside from the rich mahogany color that Linda used above. This specific color is called "Hustle".

What do you think? Has there been a makeup/eyeshadow look that you have been dying to try? I loved that this one is something I have never done. My advice is to try everything at least once. Own it. Rock it.

Thursday, September 5

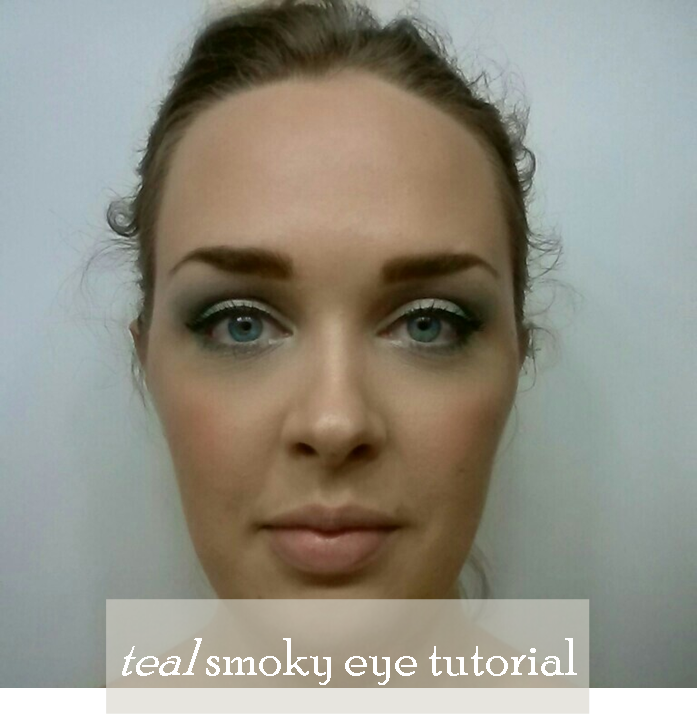
teal smoky eye tutorial


The palette I decided to use for this tutorial actually came from my August Birchbox. It was two gorgeous blue&green colors with two neutral-y colors. When I play up the colors with my eye shadows, I obviously do the neutrals but I love mixing in purples, mahogoneys, and peaches as well. But I don't really pull in many blues or teals unless it's navy because I feel like it's then a ton of blues with my eyes in on it too.

The sample palette I got last month was by Coastal Scents. I'm not 100% sure that it comes with these specific colors in the normal-size palettes, but I loved the experimentation today.


I used MAC's Paint Pot in Painterly as my base. Honestly, with this stuff in my possession, I feel like I could do anything. It's THAT good. I've said it before and I'll say it until I can't any longer. With a good quality eye shadow base, you could buy the crappiest drugstore eye shadow and it would bring out its' pigmentation in the best possible way. 

I applied the three lighter colors with my pinky finger. I hate sponges or shadow brushes because I feel as though the "true" color does not get applied to my eye all the way. My finger helps spread its' truest color. I then applied the darker teal color in the corners and along the outside 1/3 of my lower lash line with a fluffy blending brush. I use this one by MAC but any blending brush will work. I then applied black liquid liner with a little wing and mascara like normal.


I realize now that cropping pictures to just show my eyes demonstrates how crappy my picture phone is. Maybe it's time to invest in a quality camera?! Jerbear??


 I also realize that I should probably fix my hair when doing eye shadow tutorials. Bleh.

What smoky eye shadows have you tried that's not in your typical routine? I suggest you break out of your comfort zone and try blue/green combos or red/purple combos. What better Fall season to try these rich colors than now?!
 

Sunday, July 14

"Natural Apple" Pictorial


1. MAC eye shadow in Shroom, applied to the lids

2. MAC eye shadow in Haux, applied in the crease

3. VS Beauty Rush Wet/Dry Shadow in Espresso Lane, applied in outer corners

4. Covergirl Perfect Blend eye liner pencil in Mink, applied to the lash line and smudged out to make a natural cat eye look

5. Benefit They're Real! mascara in black (sample size), applied one coat to top lashes only

6. Maybelline Color Sensational lipstick in Red Revolution, applied to lips


This was my first pictorial and I'm very proud with how it turned out. Major props to my husband for taking these pictures. I should really invest in a tripod or something. 

I wanted to keep the look natural since I knew I was going to do a red lip. I don't normally wear brown eye liners but once I applied it I knew that it would pair perfectly. You could still apply a black gel/liquid liner if that's what you normally do--that's my go-to liner--but play with it and see what works best for you. And I like playing with lip colors like this candy apple red.


What's your beauty routine if you want to achieve the "natural" look? Do you dare to go red with it?